It's that part of the quarter again... crunch time. I feel like all of grad school so far has been a constant uphill battle. I'm trying to maintain a healthy balance, but, man is it hard!!! Unfortunately, running has been taking kind of a back burner lately with me averaging 2-3 runs/week of about 3-4 miles each. Not too impressive, but it is what it is. Do any of you have problems keeping your mileage up if you aren't training for anything specific? I know I do... and I haven't found any good races to train for yet that aren't WAY to expensive because I waited too long... Womp womp.
In other healthy news, last week I kicked my own butt in gear and signed back up for My Fitness Pal and can now report that I'm down 5.2lbs and have tracked for a whole week! I'm kind of skeptical about it being really 5.2lbs since I don't remember if my original weigh in was RIGHT when I woke up last Monday, but I know for a fact that I've at least lost 2.7lbs as I weighed in at 170.5 a few days later and at 167.8 this morning! :)
Jon went out of town for the weekend, so I took that chance to start doing the 30 Day Shred. I'd started (and abandoned) it once before, but this time I'm in it to win it. So far, I've just completed Day 4 and BOY am I still sore. But, that means I'm changing right?
As far as eating this week, I have two recipes from Kelly's Healthified Kitchen on tap that I HIGHLY recommend:
Chicken Cordon Bleu Casserole (might add spinach?)
Honey Lime Enchiladas
I've made both recipes before and they're delicious. :)
Anyway, have a great Monday!!
Showing posts with label recipes. Show all posts
Showing posts with label recipes. Show all posts
Monday, February 20, 2012
Friday, February 10, 2012
Morning Life Saver: Breakfast Pockets
To get back into the swing of things, here's a new favorite recipe Jon and I have been making in 2012. Our friend Amber tipped us off to this great idea, and, with a few healthy modifications, we've been making batches weekly or bi-weekly and freezing them. They're so good that we have been eating these for breakfast every single day. We even heat them up on weekends instead of our Sunday pancakes!
Anyway, here's the base recipe, based off the original that can be found here.


DELICIOUS and infinitely customizable. The first time we made them it was kind of an ordeal in our tiny kitchen—a little messy, but each time we make them, they get a little bit easier. Plus, they seem to be catching—we've already passed this recipe out to a bunch of our friends who now love them too! Enjoy!
PS- They're relatively cheap too! Without meat they run about $0.76 per pocket and around $1 with! :)
Anyway, here's the base recipe, based off the original that can be found here.
Ingredients
- 1 1/2 tblsp yeast
- 1/2 c warm water (110 degrees)
- 3/4 c skim milk (110 degrees)
- 1/2 c apple sauce (with a tiny splash of oil)
- 1/4 c sugar
- 1 egg
- 1 tsp salt
- 3 1/2 c flour (Approx. half wheat/half all-purpose)
Dough
- 1 lb bulk sausage, or some bacon, or ham... whatever meat you want (or no meat too)
- 1 c onion, chopped
- 1 1/2 c frozen hashbrown potatoes, thawed
- Half container of egg beaters (equiv. 7 eggs)
- 3 tblsp milk
- 1/2 tsp salt
- 1/2 tsp pepper
- 1/2 tsp garlic salt
- pinch of cayenne pepper
- 2 c cheddar cheese, shredded
Base Filling Starter (we also add whatever veggies we feel like)
Instructions
- In a bowl, dissolve yeast in the water.
- Add milk, oil/applesauce, sugar, egg, salt, and 2 cups flour; beat until smooth.
- Add enough flour until it makes a soft dough but do not knead. Cover and let rise in a warm place until doubled, about 1 hour.
- Cook the meat and onion over medium heat until browned. Drain. Add whatever veggies you want. We usually do spinach, mushroom, pepper, etc. Then add hashbrowns, eggs, milk, and spices. Cook and stir until set. Sprinkle with cheese and keep warm.
- Preheat oven to 350°.
- Punch down the dough and cut into 16 equal pieces.
- Roll each piece into 7 in circle on a floured surface (Note: I don't have a rolling pin, so I just try and stretch it with my hands... Less pretty, but seems to work just fine!). Top with 1/3 c filling, fold, and pinch shut. Bake for 15-20 minutes.
Dough:
Filling:
Assembling the pockets:

Our first attempt getting ready to go in the oven.
Future attempts have been prettier. ;)
- Allow to cool on the baking sheet. Once cooled, place in the freezer until frozen. Store in a ziploc bag in the freezer for 3-6 months. To reheat, the original suggests you place it on a paper towel and microwave for 1 1/2-2 minutes. To get a crispier pocket, Jon and I throw them in the oven when we get up (without waiting for the oven to preheat to 350º again) and then go about our business getting ready for 30 or so minutes and then grab them on the way out the door nice and warm and crispy. You can also speed up the oven process by putting them in the microwave for 30-45 seconds first.
To freeze:

DELICIOUS and infinitely customizable. The first time we made them it was kind of an ordeal in our tiny kitchen—a little messy, but each time we make them, they get a little bit easier. Plus, they seem to be catching—we've already passed this recipe out to a bunch of our friends who now love them too! Enjoy!
PS- They're relatively cheap too! Without meat they run about $0.76 per pocket and around $1 with! :)
Wednesday, November 9, 2011
Epic Dessert Creation: The Recap
Let's just start by saying that cake-baking don't come cheap. I think I spent at least $45 on butter, cream cheese, eggs, etc etc etc. Still cheaper than ordering one, but still.
Since we had company in town, I divvied up the extravaganza into two days: Friday or the baking of cakes and cupcakes and Saturday for the frosting and presentation.
And now, let the photo tour of my baking extravaganza begin!
Project One: Operation 4-layer Cake and Dexter-esque Cupcakes


Since we had company in town, I divvied up the extravaganza into two days: Friday or the baking of cakes and cupcakes and Saturday for the frosting and presentation.
And now, let the photo tour of my baking extravaganza begin!
Project One: Operation 4-layer Cake and Dexter-esque Cupcakes

Greasin' my $0.97 pans

Using Melania's tip to fold the parchment paper and make a circle via the "snowflake method"

Rookie Error #1: Misunderstood directions, so I put parchment paper ALL over the pan, not just the bottom

Batter. Since I'm unmarried and do not own a stand mixer, note the epic splatter on my microwave. This repeated with every new mixing session.

Chocolate Batter

Finished, unnecessarily curvy cake layers #1 and #2 (there were 4 total)

Irregularities that will make icing fun... and that could have been avoided. #CakeRookie

The cocoa/food coloring paste looked like blood.
And stained my fingers.
And then reminded me of the opening credits on Dexter.

Replacing buttermilk with regular milk + 1 tbsp of lemon juice. Who knew?

Finished cupcakes.
Operation Baking : Completed.
Project Two (the Next Day): Let's Frost that!

First time I have used my Tupperware manual food processor.
Tough at first with the whole cookies, but worked great.

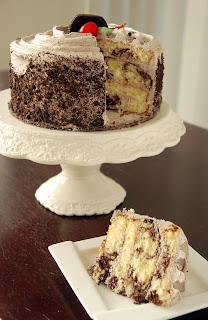
Cookies and cream frosting... Would you like some cake with your frosting?

Amber helps prepare my new cake stand


And voilà!!!
Success!
Jon was impressed.
Overall, this bout with dessert making has taught me a few things:
1. The sheer amount of butter, sugar, and cream cheese that goes into baking
2. Don't bake the cake-y parts the day before (they'll dry out)
3. Put parchment paper down on your cake stand before icing
4. It's going to be awhile before I perfect desserts. TOO much sugar. My body isn't used to it and Jon and I could certainly feel our poor food choices the following day on our run!
Still, I'm proud of my pretty desserts and I'm really happy that Jon really appreciated them for his bday!
Do you guys make any fun desserts? When you bake, do you try to lighten the recipe, or do you indulge on the buttery/cream cheesey goodness from time to time?
Thursday, November 3, 2011
Nicky and an entry into baking...
I know I just posted about "baking" pizza crust. IMHO, not the same thing as pastry baking. For some reason, baking desserty things just kind of terrifies me.
That said, my handsome man is having a birthday on Saturday and we have some very good friends coming into town from Alabama to celebrate. SO, I'm facing my fear and have planned two dessert recipes to feed the hordes (ie. 10ish people) that will be stopping by Saturday for dessert, singing, and hopefully watching LSU beat 'Bama. (Fingers crossed!)
At the birthday boy's request, I'm endeavoring to make a cookies and cream cake AND red velvet cupcakes.


I found this recipe for the cake, and after interrogating my baking extraordinaire friend (seriously, she's made homemade croissants before), she suggested substituting this recipe for the icing. Then, for the cupcakes, I plan to use this guy. I know they aren't at all "healthy" or "light" recipes, but your handsome man only turns 30 once right? Plus, I don't do this kind of thing all the time (clearly), so my waistline will survive.
I'm very nervous, but Melania assures me I can pre-bake things then ice the day of, so at least I'll have time to buy a cake mix if I totally burn everything.
So, there you have it. Here's my next challenge. I'll let you all know how it goes.
On that note, off to the store (and then hopefully off for a run)!
That said, my handsome man is having a birthday on Saturday and we have some very good friends coming into town from Alabama to celebrate. SO, I'm facing my fear and have planned two dessert recipes to feed the hordes (ie. 10ish people) that will be stopping by Saturday for dessert, singing, and hopefully watching LSU beat 'Bama. (Fingers crossed!)
At the birthday boy's request, I'm endeavoring to make a cookies and cream cake AND red velvet cupcakes.


Photos from the below websites...
Highly unlikely anything I make will be this pretty.
I found this recipe for the cake, and after interrogating my baking extraordinaire friend (seriously, she's made homemade croissants before), she suggested substituting this recipe for the icing. Then, for the cupcakes, I plan to use this guy. I know they aren't at all "healthy" or "light" recipes, but your handsome man only turns 30 once right? Plus, I don't do this kind of thing all the time (clearly), so my waistline will survive.
I'm very nervous, but Melania assures me I can pre-bake things then ice the day of, so at least I'll have time to buy a cake mix if I totally burn everything.
So, there you have it. Here's my next challenge. I'll let you all know how it goes.
On that note, off to the store (and then hopefully off for a run)!
Pizza, Pizza
Ever since we met, Jon and I have been on a kick to make food/sauces ourselves rather than buy the canned/pre-made version. First we conquered spaghetti and pizza sauce. Then pancake mix. Most recently, alfredo. Then, this weekend we were walking around Kro-zjay (Kroger) and decided it'd been a long time since we'd made homemade pizza. Well... mostly homemade. Up until now, we've made our sauce, but then just bought the mixture to make the crust. So, this time, we decided to make the pizza from the ground, er... dough up. I have to say, it's just really nice knowing everything that goes in your food.
After some googling, I decided on this recipe, but with some change and additions. So, here is the Nicky-fied version. It turned out great (and is vehemently hungry boyfriend-approved).
Ingredients
-2 1/4 tsp active dry yeast (aka one 1/4oz packet... I had to google it to make sure)
-1/2 tsp brown sugar
-1 1/2c warm water
-1 tsp salt
-2 tbsp olive oil
-1c whole wheat flour*
-3 1/3c all-purpose flour*
-corn meal (and extra flour) as needed
-parchment paper
Directions
1. In a large bowl, dissolve the yeast and brown sugar in the water and let it sit for 10 minutes (I forgot to let it sit and just realized it... oops. Oh well.)
2. Add in the salt and oil to the yeast mix and slowly mix in the 2 1/2c of the flour (I used 1c ww and 1 1/2 white)
3. To make less of a mess, cover a bit of open counter with some parchment paper. Sprinkle some of the remaining flour on the paper and then turn out the dough onto the paper. Knead the dough (and keep adding flour) until the dough is no longer sticky. If you want to make two normal-sized pizzas (rather than one "giant" one), divide the dough into two balls and knead accordingly.

4. Place each dough ball into a well-oiled bowl and cover with a kitchen towel. Let rise for 1 hour.
Before:

After! Ta-Da!

5. Preheat the oven to 425º. If you're using a pan, oil the surfaces, if not, just get out your stone. Sprinkle corn meal as desired onto the pan/stone (I like to have a thin coating).

I ended up adding more than is in this photo, FYI.
6. Turn the dough ball out of the bowl onto the baking dish and spread it out to the desired size. (If you're using a pan, it suggests that you let the dough sit in the pan for 20 minutes before adding toppings... I didn't and it turned out just fine). Then, add sauce, toppings, and cheese.
7. Bake for 15-20 minutes until the cheese and crust are golden brown.
8. Enjoy!
Jon and I opted for both a stone version and a pan version to see which we like better. Both turned out really well, but the pan version was harder to cut (and eat without a fork). I'm lame and forgot to photograph our pan crust pizza, but here's our stone version with ham, pineapple, and olives. Yum! PS It even passed the cold pizza test. Had it for lunch yesterday. Mmm I love cold pizza...

What are your favorite pizza toppings?
Are there any foods that you much prefer to make yourself rather than buy pre-made (or vice-versa)?
Tuesday, November 1, 2011
Pumpkin Grilled Cheese (and other weekend shenanigans)
As I've mentioned before, I have a slight problem obsession with Fall squash recipes. So, of course, when I saw Hungry Girl's recipe for Pumpkin Grilled Cheese, I *had* to try it. It didn't hurt that I'd made us Pumpkin Waffles for breakfast and had half a can of pumpkin left over that needed to be used either. I won't post the waffle recipe because it wasn't stellar (needs some work), but the grilled cheese will definitely be repeated. I sadly, didn't have all her ingredients so I improvised like this:


Ingredients (makes 2!):
-4 slices of bread
-buttery spread
-2 slices mild cheddar cheese
-1/4c shredded cheddar cheese
-1/4 onion finely diced (my onion pieces weren't as small as I now wish they'd been)
-1/2c pumpkin
-cayenne pepper
-black pepper
-red pepper
Directions:
1. Heat up that skillet to optimal grilled cheese temperature--add in a tsp of olive oil and your 1/4c onions and sauté them until the onions are nice and soft.
2. In a bowl, mix the pumpkin, spices (to taste), onion, and 1/4c shredded cheese. Keep the pan on the burner though so it keeps heating up to that optimal grilled cheese temp!

3. Butter your bread as normal.
4. Now, it's grillin' time! In addition to the slice of cheese, also scoop half the pumpkiny mixture onto the sandwich as well before placing the other piece of bread on it, and throwin' (i.e. gently placing) the grilled cheese in the skillet. Be careful when you flip it because unlike with melted cheese who holds the slices together, the pumpkin just kinds of hangs out!

5. Enjoy your cheesy, pumpkin-y goodness!

Jon and I really liked this recipe. It was hearty and more filling than a regular grilled cheese, that's for sure! Plus, it's a great way to use up any leftover pumpkin you might have from another recipe. If I ever get the Laughing Cow cheeses, I'll be really interested in trying the actual HG recipe to see how we like that!
Aside from eating pumpkin-inspired recipes this weekend, we also finally semi-finished our patio! We've been storing things (tailgating chairs, AU tailgating tent, coolers, yard tools, etc) out there out in the open since we moved in (which is unsafe for your stuff when you live in a city) and have been trying to decide what to do to store it. Thankfully, we found a storage closet on an end-of-season sale at Sears and got it all set up this weekend! We also got rid of a rose bush that made our patio look tiny (and kept poking us when we moved things) and got some of the digging ready for our garden we hope to plant in the Spring. Check it out!

Pre-digging, post-moving everything inside:


Aside from eating pumpkin-inspired recipes this weekend, we also finally semi-finished our patio! We've been storing things (tailgating chairs, AU tailgating tent, coolers, yard tools, etc) out there out in the open since we moved in (which is unsafe for your stuff when you live in a city) and have been trying to decide what to do to store it. Thankfully, we found a storage closet on an end-of-season sale at Sears and got it all set up this weekend! We also got rid of a rose bush that made our patio look tiny (and kept poking us when we moved things) and got some of the digging ready for our garden we hope to plant in the Spring. Check it out!
A photo from a few weeks ago when a squirrel decided to use our piled stuff as a perch:

Pre-digging, post-moving everything inside:

Future home of the storage unit:

Jon 1-Rosebush 0!

Voila! We'll do some gardening where the rosebush was in addition to that little strip there under the window. So excited! Not only is it cleaner and more open, but our stuff is safe!

What did you get accomplished this past weekend? Not going to lie, there's just something really satisfying about getting jobs done around the house!
Thursday, October 27, 2011
Race Photos & Stuffed Acorn Squash
Happy Thurfriday, all!
If you're in my household, you're lucky enough to have Fridays off, which make Thursdays one of my favorite days of the week. Plus, I just picked my classes for winter quarter and it looks as though this 3-day weekend business will be a part of my life until at least March! Bonus!
Want to know another bonus? They posted the official photos from the half last weekend!!! Check 'em out! I apologize there are so many, so just skip down if you get bored and want to just see the recipe!


Like Christina posted last week, I wish race photos weren't so expensive so I could buy a few. Bummer. Still, makes me look like a pretty hardcore runner!
Anyway, here's another delicious Fall recipe to share: Stuffed Acorn Squash. It's another old WW favorite (so I didn't make it up), but it is DELICIOUS. The department chair/my professor at work even asked for the recipe!

Directions:
1. Preheat the oven to 375º, Also, so you don't forget to cook the rice before you want to bake it with the squash (like I did), go ahead and get out a pot and get the water boiling for that brown rice (mine usually takes 45-50 minutes to cook).
2. Cut the squash in half and scoop out the seeds. Spray a baking sheet with cooking spray and place the halves on it face down (sometimes I like to put a bit of water on the tray too) and bake for approximately 50 minutes (or until tender)
3. Hang out for a bit (or cut up your veggies if you haven't yet). Then, when you have maybe 20 minutes until go-time (i.e. when the squash will be out of the oven), spray a skillet with some cooking spray (or add some EVOO) and sauté the mushrooms, scallions (or shallots), and garlic over medium heat.
4. Once the mushrooms look like they've started to give off some liquid, stir in the Worcestershire sauce, rosemary, sage, thyme, and pepper. Cook for a minute or so.
5. Take the pan off the heat and add in the rice, cheese, and wine.
6. Then, remove the squash from the oven, flip them over and fill each with the rice mixture. Replace the filled squash in the oven and bake for about 10 minutes.
I think this is a great, hearty Fall dinner! It's really savory and filling and it almost feels like there's meat or something in it, but there's not. It's delicious.
Have a great Thursday all!!! :)
If you're in my household, you're lucky enough to have Fridays off, which make Thursdays one of my favorite days of the week. Plus, I just picked my classes for winter quarter and it looks as though this 3-day weekend business will be a part of my life until at least March! Bonus!
Want to know another bonus? They posted the official photos from the half last weekend!!! Check 'em out! I apologize there are so many, so just skip down if you get bored and want to just see the recipe!

Jonboy thinks he looks "like a tool" with the layers, but I told him he looks like a hardcore runner.
At 9 minutes miles, I think he definitely is.

Look at that determination.


This is what a sub 2h half looks like.


Determination. Any carrying my cell phone. fun.

Thought I looked much cooler in my head than I did in reality...

I have a lot of hair.

Leaving a happy Jon in the distance to sprint to the finish.
Look! I'm flying!

Success! In my mind, I looked way more triumphant that I do in this photo. Oh, fatigue.


Jon crossing the finish for the 2nd time

Distance shot!
Like Christina posted last week, I wish race photos weren't so expensive so I could buy a few. Bummer. Still, makes me look like a pretty hardcore runner!
Anyway, here's another delicious Fall recipe to share: Stuffed Acorn Squash. It's another old WW favorite (so I didn't make it up), but it is DELICIOUS. The department chair/my professor at work even asked for the recipe!

The perfect size to be reheated for lunch!
Sorry I forgot to take a photo of them fresh out of the oven! Oops!
Ingredients:
-2 medium acorn squash
-Nonstick cooking spray
-8oz cremini or button mushrooms, thinly sliced
-3 medium scallions thinly sliced (I substituted this for 3 shallots, which I really liked)
-2 cloves of garlic, minced
-2tsp Worcestershire sauce (PS British friends, how do you pronounce this?)
-1/2 tsp dried rosemary
-1/2 tsp rubbed sage
-1/2 tsp dried thyme
-1/2 tsp ground black pepper
-1 1/2 cups cooked brown rice
-1/4 cup grated parmesan (Fresh is best, though I used the pre-grated stuff)
-3 tbsp dry white wine
Directions:
1. Preheat the oven to 375º, Also, so you don't forget to cook the rice before you want to bake it with the squash (like I did), go ahead and get out a pot and get the water boiling for that brown rice (mine usually takes 45-50 minutes to cook).
2. Cut the squash in half and scoop out the seeds. Spray a baking sheet with cooking spray and place the halves on it face down (sometimes I like to put a bit of water on the tray too) and bake for approximately 50 minutes (or until tender)
3. Hang out for a bit (or cut up your veggies if you haven't yet). Then, when you have maybe 20 minutes until go-time (i.e. when the squash will be out of the oven), spray a skillet with some cooking spray (or add some EVOO) and sauté the mushrooms, scallions (or shallots), and garlic over medium heat.
4. Once the mushrooms look like they've started to give off some liquid, stir in the Worcestershire sauce, rosemary, sage, thyme, and pepper. Cook for a minute or so.
5. Take the pan off the heat and add in the rice, cheese, and wine.
6. Then, remove the squash from the oven, flip them over and fill each with the rice mixture. Replace the filled squash in the oven and bake for about 10 minutes.
I think this is a great, hearty Fall dinner! It's really savory and filling and it almost feels like there's meat or something in it, but there's not. It's delicious.
Have a great Thursday all!!! :)
Subscribe to:
Posts (Atom)